Validate Email Format in Power Automate Using Custom Connector and Regex in C#
Validating email formats in workflows is important to pre-check the data before using it in business logic and to avoid errors. While Power Automate has many actions, it doesn’t include advanced email validation by default. In this blog, you’ll learn how to create a Custom Connector to validate email addresses using C# code and Regex.
High-Level Solution:
- Create a Custom Connector in Power Automate that uses C# and Regex for email format validation.
- Use the Custom Connector in Power Automate flows to dynamically validate email addresses.
Steps to Implement:
Step 1: Create the Custom Connector
1.1 Create Blank Custom connector
- Log in to Power Automate.
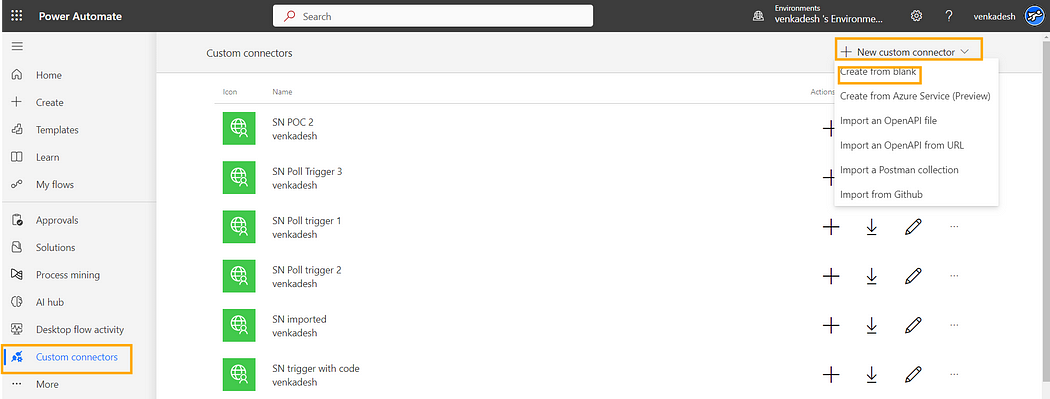
- From the left menu, select Custom Connectors. If not visible, go to More > Discover All > Locate Custom Connectors under the Data section.
- Click on New Custom Connector, then select Create from Blank.
1.2 General Configuration
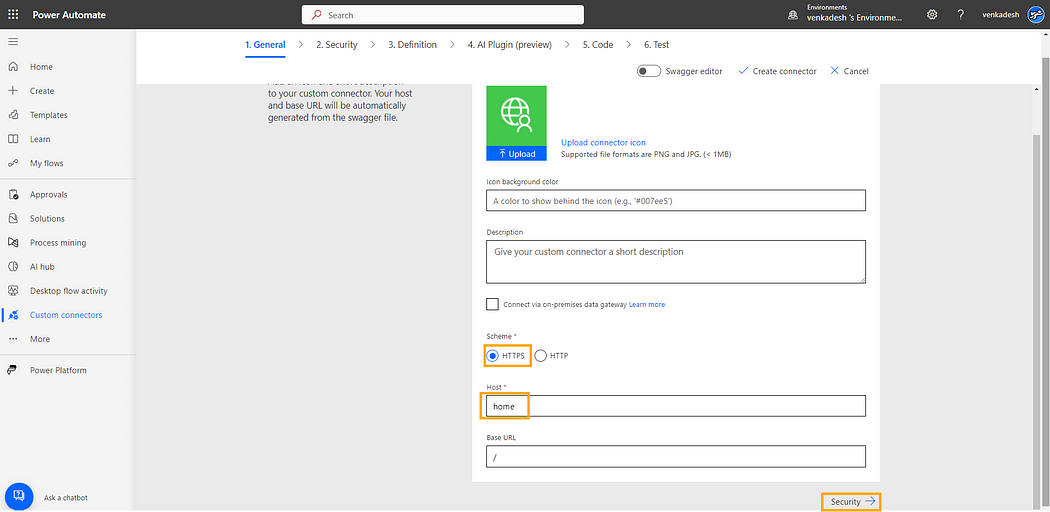
- Enter a connector name, for example, Email Format Validator Demo.
- Under Scheme, choose HTTPS and enter any placeholder text for the Host (e.g., “home”), as no API calls are required.
- Click on Security to configure authentication settings.
1.3 Security Configuration
- Set Authentication Type to No authentication since this validation doesn’t require authentication.
- Click Definition

1.4 Configure the Action for Email Validation
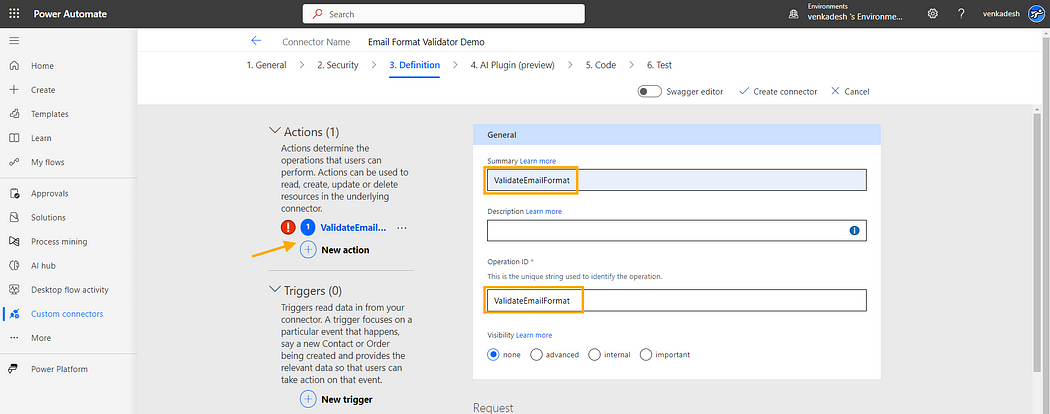
- Click New Action.
- Under Summary, name the action something like ValidateEmailFormat.
- For Operation ID, use the same identifier: ValidateEmailFormat.
1.5 Configure the Request
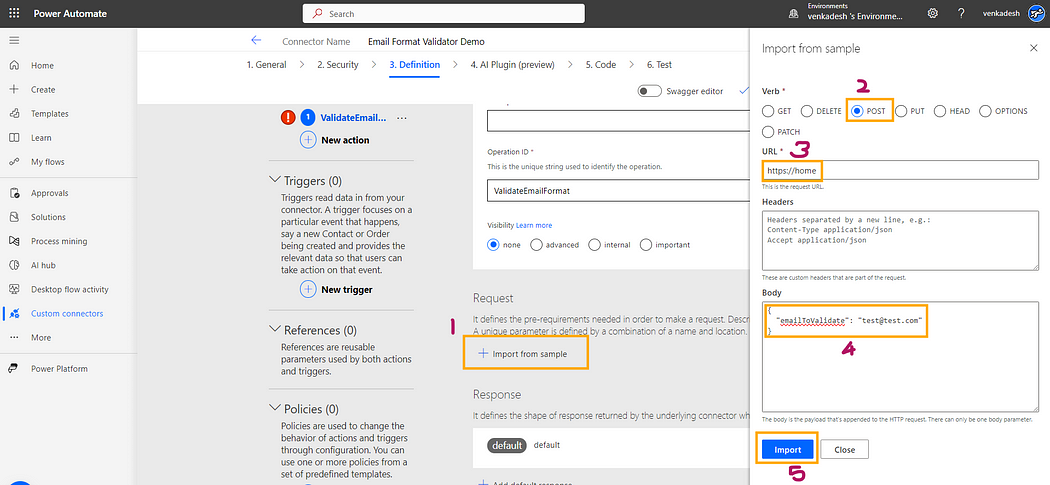
- Under Request, click Import from Sample.
- Fill in the following values, click Import and click AI Plugin
- Verb: POST
- URL: https://home
- Body:
{
  "emailToValidate": "test@test.com"
}
This will prepare the connector to accept an email address for validation.
1.6 Add the C# Code for Email Validation
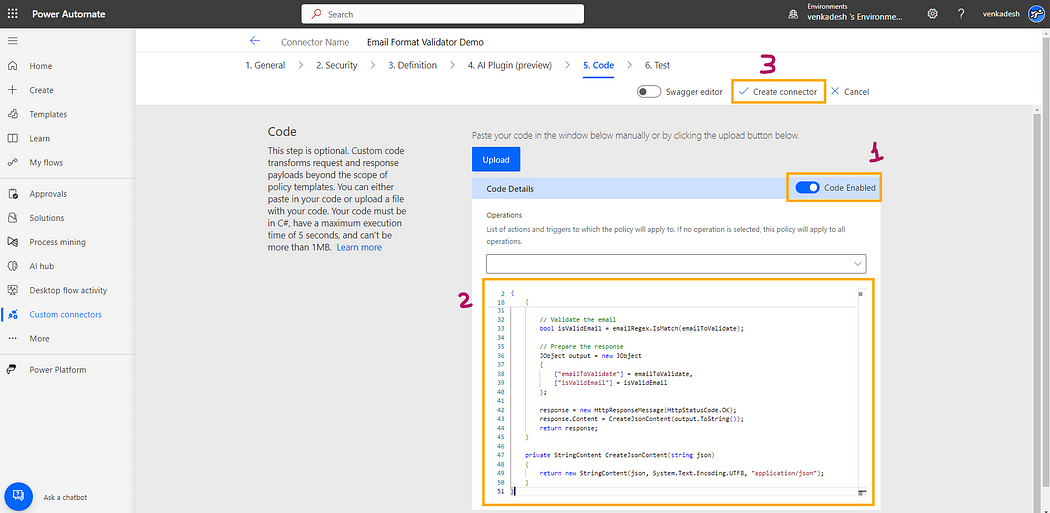
- In your custom connector’s Code section, Toggle on Code
- Paste the following C# code and click Create Connector
public class Script : ScriptBase
{
    public override async Task<HttpResponseMessage> ExecuteAsync()
    {
        // Check if the operation ID matches the expected one for email validation
        if (this.Context.OperationId == "ValidateEmailFormat")
        {
            return await this.HandleEmailValidationOperation().ConfigureAwait(false);
        }

        // Handle an invalid operation ID
        HttpResponseMessage response = new HttpResponseMessage(HttpStatusCode.BadRequest);
        response.Content = CreateJsonContent($"Unknown operation ID '{this.Context.OperationId}'");
        return response;
    }

    private async Task<HttpResponseMessage> HandleEmailValidationOperation()
    {
        HttpResponseMessage response;
        var contentAsString = await this.Context.Request.Content.ReadAsStringAsync().ConfigureAwait(false);

        // Parse the content as JSON
        var contentAsJson = JObject.Parse(contentAsString);

        // Get the email value
        var emailToValidate = (string)contentAsJson["emailToValidate"];

        // Define a regular expression for email validation
        string emailRegexPattern = @"^[^@\s]+@[^@\s]+\.[^@\s]+$";
        var emailRegex = new Regex(emailRegexPattern);

        // Validate the email
        bool isValidEmail = emailRegex.IsMatch(emailToValidate);

        // Prepare the response
        JObject output = new JObject
        {
            ["emailToValidate"] = emailToValidate,
            ["isValidEmail"] = isValidEmail
        };

        response = new HttpResponseMessage(HttpStatusCode.OK);
        response.Content = CreateJsonContent(output.ToString());
        return response;
    }

    private StringContent CreateJsonContent(string json)
    {
        return new StringContent(json, System.Text.Encoding.UTF8, "application/json");
    }
}
This code uses a Regex pattern (^[^@\s]+@[^@\s]+\.[^@\s]+$) to validate the email format. If the email format matches the pattern, it returns isValidEmail: true, otherwise, it returns isValidEmail: false.
Note: There are various ways to validate the email format. To validate email addresses with common domain names such as .com, .org, .co, .io, etc., you can modify the regular expression to explicitly list these top-level domains (TLDs). Here's how you can update the regular expression to achieve that:
string emailRegexPattern = @"^[^@\s]+@[^@\s]+\.(com|org|co|io)$";Explanation:
^[^@\s]+: This matches the part before the@, ensuring it doesn't contain spaces or@symbols.@: Matches the@symbol.[^@\s]+: This matches the domain name part (e.g.,gmailortest).\.: This matches the dot (.) before the top-level domain.(com|org|co|io): This matches the TLD and only accepts.com,.org,.co, or.io.
Examples:
test@test.com– Validtest@test.org– Validtest@test.co– Validtest@test.io– Validtest@test.te– Invalidtest@test.test– Invalid
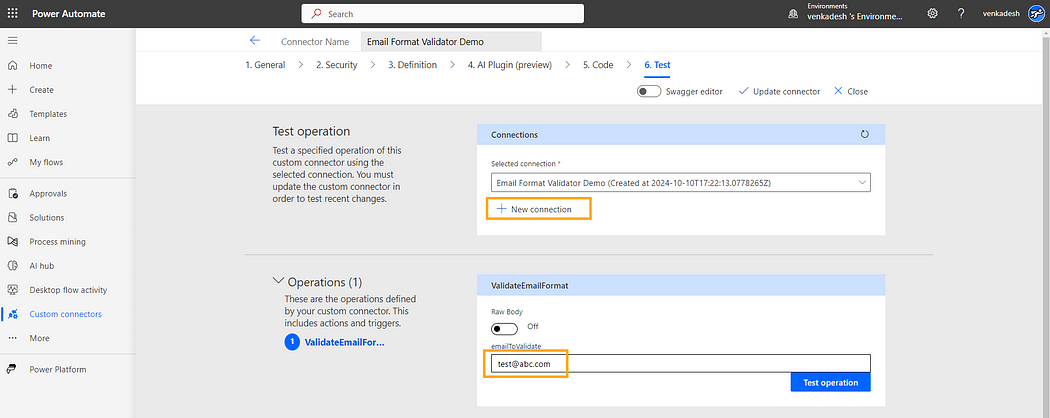
1.7 Test the Operation
- Click New Connection
- Enter input for emailToValidate field (e.g. test@abc.com)
- Click Test Operation
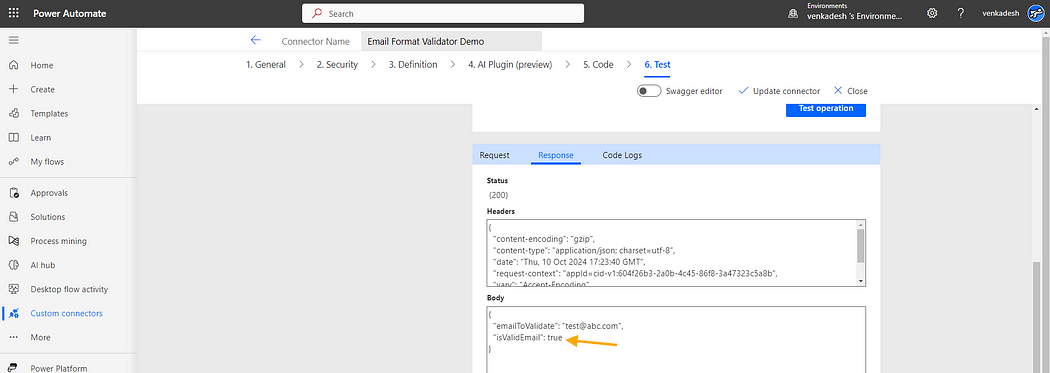
Output:
The response from the test operation will be displayed in the body section.
Step 2: Use the Custom Connector in Power Automate Flow
Now that the Custom Connector is set up, let’s incorporate it into a Power Automate flow.
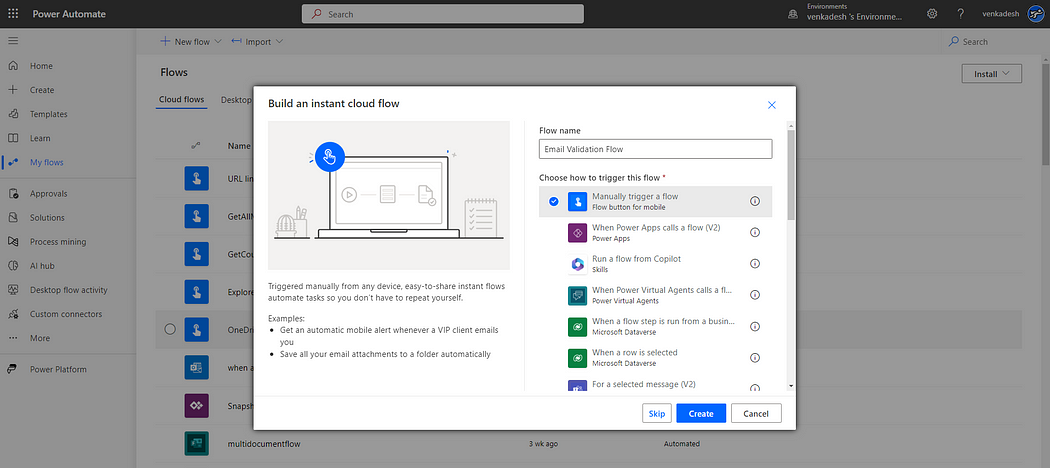
2.1 Create a New Flow
- In Power Automate, create a new flow — name it something like Email Validation Flow.
- Add a trigger, for example, Manually trigger a flow.
2.2 Add the Custom Connector Action to Flow
- After your trigger, add the Custom Connector action you just created by filtering with ‘custom’
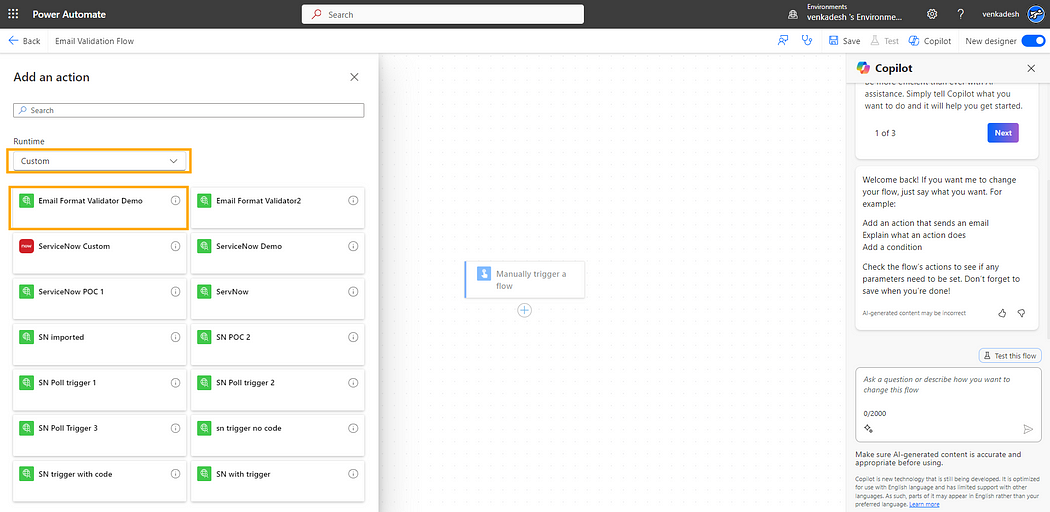
Note: If your custom action is not visible, refresh the tab or just switch environments and return to working environment to trigger the refresh
2. Pass the email address into the emailToValidate parameter of the connector, Save and Test

3. Verify that the response shows whether the email format is valid or not.
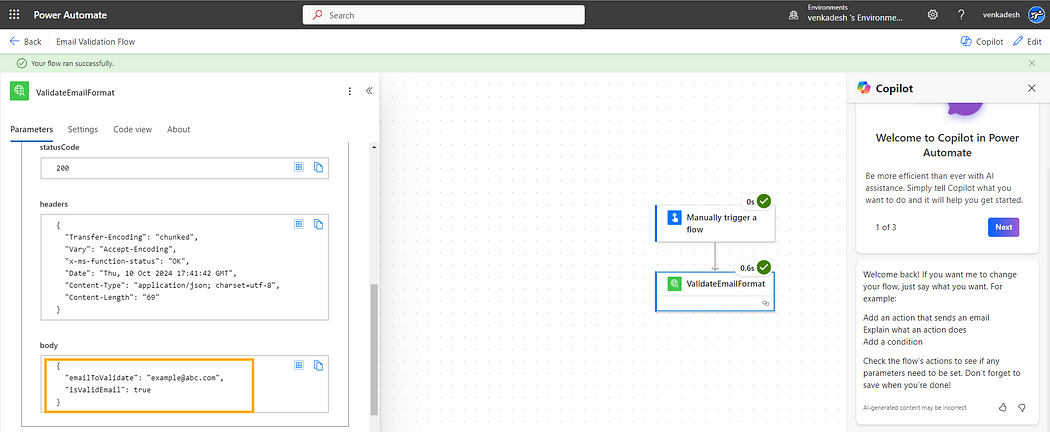
That’s it! You can now perform email validation using this single action and easily reuse it across your environment.
Conclusion
By integrating this custom connector into your Power Automate flows, you gain a powerful tool to validate email formats using C# and Regex. This approach enhances your workflows by ensuring that only correctly formatted email addresses are processed, thereby improving code and data quality.
Feel free to adapt the Regex pattern for more complex validation rules or expand this connector to cover other use cases.
Practical Use Case: Integrating MS Forms and SharePoint with Email Validation
Scenario: A company wants to integrate Microsoft Forms with SharePoint using Power Automate. Since MS Forms lacks a People control to capture email addresses, a Text field is used instead. This can lead to manual errors in email addresses, making validation crucial before sending the data to SharePoint.
If you found this article helpful, give it a clap! 👍 And don’t forget to follow me for more useful tips and tutorials like this!
Comments
Post a Comment